VulsRepo
注意 usiusi360/vulsrepo はもうメンテナンスされていません。
メンテンスリポジトリを使用する必要があります。: ishiDACo/vulsrepo
VulsRepo is awesome OSS Web UI for Vuls. With VulsRepo you can analyze the scan results like Excel pivot table.
オンラインデモ
必須要件
- future-architect/Vuls >= v0.9.0
- Webブラウザ : Google Chrome か Firefox
インストール
A home folder of vuls is explained as /opt/vuls.
Step1. VulsでJSON形式のファイルを出力
<br />$ cd /opt/vuls
$ vuls scan
$ vuls report -format-json
Output to a JSON files (/opt/vuls/results)
Step2. VulsRepoのインストール
From now on, executed by a user running the vuls scan.
- GitHubからクローン
$ cd $HOME
$ git clone https://github.com/ishiDACo/vulsrepo.git
Step3. vulsrepo-serverの設定を変更
Set Path according to your own environment.
$ cd $HOME/vulsrepo/server
$ cp vulsrepo-config.toml.sample vulsrepo-config.toml
$ vi vulsrepo-config.toml
[Server]
rootPath = "/home/vuls-user/vulsrepo"
resultsPath  = "/opt/vuls/results"
serverPort  = "5111"
- ResultsPath に対してシンボリック リンクのパスを設定してはいけない。
Step4. vulsrepo-serverを起動
$ pwd
$HOME/vulsrepo/server

$ ./vulsrepo-server
2017/08/28 11:04:00 main.go:90: INFO: RootPath Load:  /root/work/vulsrepo
2017/08/28 11:04:00 main.go:97: INFO: ResultsPath Load:  /opt/vuls/results
2017/08/28 11:04:00 main.go:66: Start: Listening port: 5111
- Linux(64 ビット)以外については自分でビルドする必要がある。 「ビルド」セクションを参照すること。
Step5. vulsrepo-serverを常駐起動
Case: SystemV (/etc/init.d)
- スタートアップ ファイルをコピーする。環境に合わせて内容を変更する。
$ sudo cp $HOME/vulsrepo/server/scripts/vulsrepo.init /etc/init.d/vulsrepo
$ sudo chmod 755 /etc/init.d/vulsrepo
$ sudo vi /etc/systemd/system/init.d/vulsrepo
- 自動起動するよう設定する。
$ sudo chkconfig vulsrepo on
- vulsrepo-serverを起動する。
$ sudo /etc/init.d/vulsrepo start
Case: systemd (systemctl)
- スタートアップ ファイルをコピーする。環境に合わせて内容を変更する。
$ sudo cp $HOME/vulsrepo/server/scripts/vulsrepo.service /lib/systemd/system/vulsrepo.service
$ sudo vi /lib/systemd/system/vulsrepo.service
- 自動起動するよう設定する。
$ sudo systemctl enable vulsrepo
- 設定が正しいかチェックする。
$ sudo systemctl list-unit-files --type=service | grep vulsrepo
vulsrepo.service                           enabled
- vulsrepo-serverを起動する。
$ sudo systemctl start vulsrepo
DigestAuth
DigestAuth implementation has a lot of problems. It requires multiple authentications on Chrome, Chromium and Firefox. If authentication is required, it's easier to isolate it by using nginx and vulsrepo-server with a proxy.
To perform digest authentication, create an authentication file
$ ./vulsrepo-server -h
Usage of ./vulsrepo-server:
  -c string
        AuthFile Path (default "/home/vuls-user/.htdigest")
  -m    make AuthFile
  -r string
        realm (default "vulsrepo_local")
  -u string
        login user (default "vuls")

ex)
$ ./vulsrepo-server -m
Password: ****
AuthFile Path   :  /home/vuls-user/.htdigest
realm           :  vulsrepo_local
login user      :  vuls
2017/08/28 19:11:59 main.go:96: Create Success
Edit vulsrepo-config.toml
$ vi vulsrepo-config.toml
[Auth]
authFilePath = "/home/vuls-user/.htdigest"
realm = "vulsrepo_local"
Start vulsrepo-server
Use SSL
Create a self-signed certificate
$ openssl genrsa -out key.pem 2048
$ openssl req -new -x509 -sha256 -key key.pem -out cert.pem -days 3650
Edit vulsrepo-config.toml
$ vi vulsrepo-config.toml
[Server]

serverSSL = "yes"
serverCert = "cert.pem"
serverKey = "key.pem"
Start vulsrepo-server
Build vulsrepo-server
- Linux(64bit)以外は自分でビルドする必要がある。
- 事前にgolangをインストールしておくこと。
$ mkdir -p $GOPATH/src/github.com/ishiDACo/
$ cd $GOPATH/src/github.com/ishiDACo/
$ git clone https://github.com/ishiDACo/vulsrepo.git
$ cd vulsrepo/server
$ go get -u github.com/golang/dep/...
$ dep ensure
$ go build -o vulsrepo-server
使い方
VulsRepo の表示
Please access the following URL in your browser. If you have JavaScript disabled in your browser, please enable it.
http://<server-address>:5111
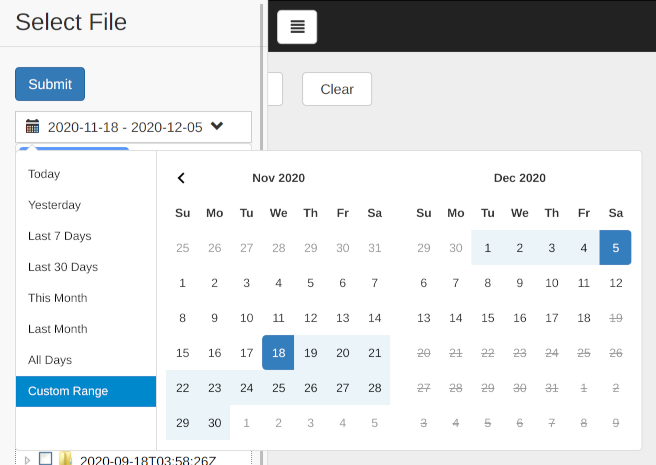
表示対象データの選択
In the initial state, the data of the most recent day of the scan is selected for display. You can narrow down the target range by date. Select a range from the drop-down list.
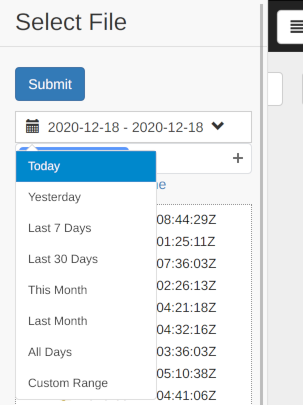
You can specify any range with Custom Range.
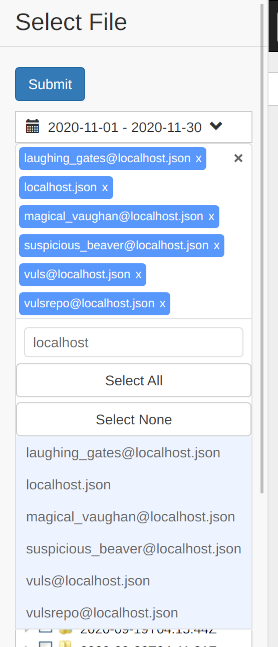
You can narrow down the target by server name. You can select more than one.
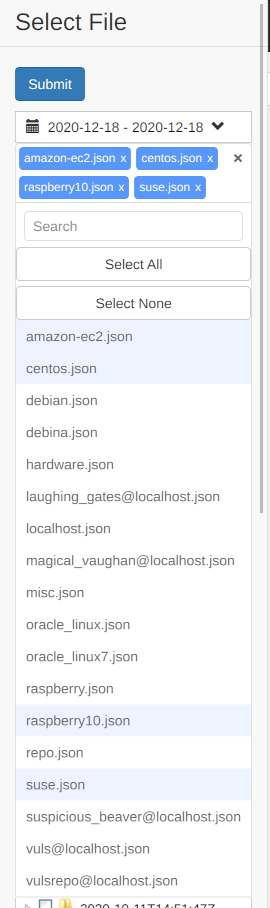
You can also filter targets by server name and then select and deselect them.
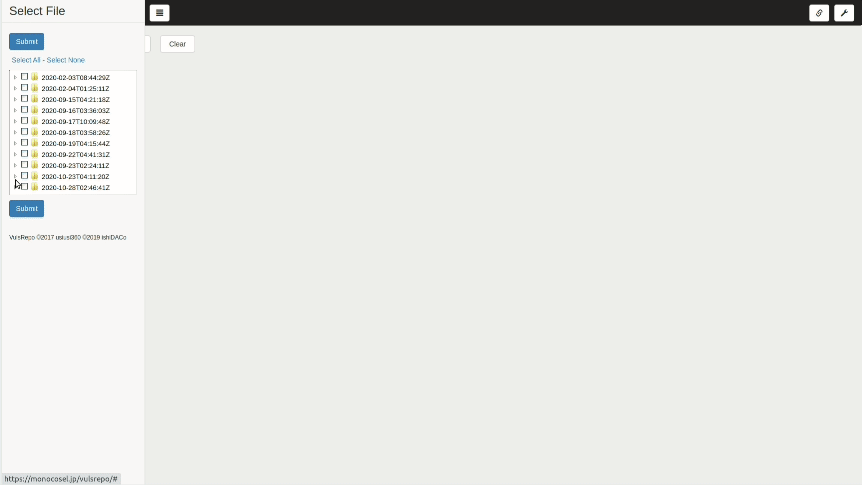
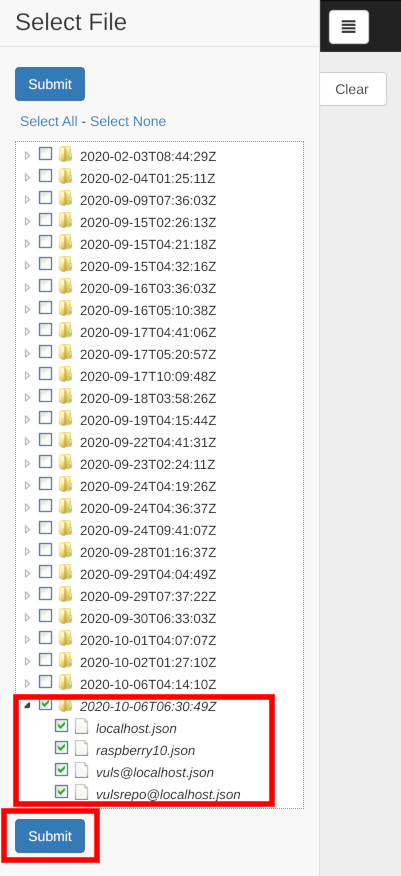
If you want to make a detailed selection, please select the data you want to display in the file selection tree. You can select multiple files. Click Select All to select them all together, or Select None to clear them.
Click the Submit button after selecting them.
When the data is loaded, the pivot table is shown as follows.
トラブルシューティング: ファイル選択ツリーが出ない
- Make sure that the directory
/opt/vuls/resultsis the correct one to refer to as the output of Vuls. - Vuls の出力結果として参照しているディレクトリに大量のファイルがある場合、ファイル選択ツリーの生成に失敗します。 その場合、不要な
*.jsonファイルを別のディレクトリに移動するか、VulsRepoを表示する前に削除してください。
トラブルシューティング: ピボットテーブルが出ない
- Make sure that you have not changed the directory name and file name under the
resultsdirectory. - Do not append
/to theresultsPathvalue. For example,resultsPath = "/opt/vuls/results/"is wrong andresultsPath = "/opt/vuls/results"is the correct setting.
If you try to load a large amount of data, it may fail. Please use the following methods.
- Reduce the selection of the data to be displayed and load it again.
- Setting
Summary,Cvss MetricsorAffected ProcessestoOFFin theSettingmay solve this problem (see Display setting - Show / Hide the Item).
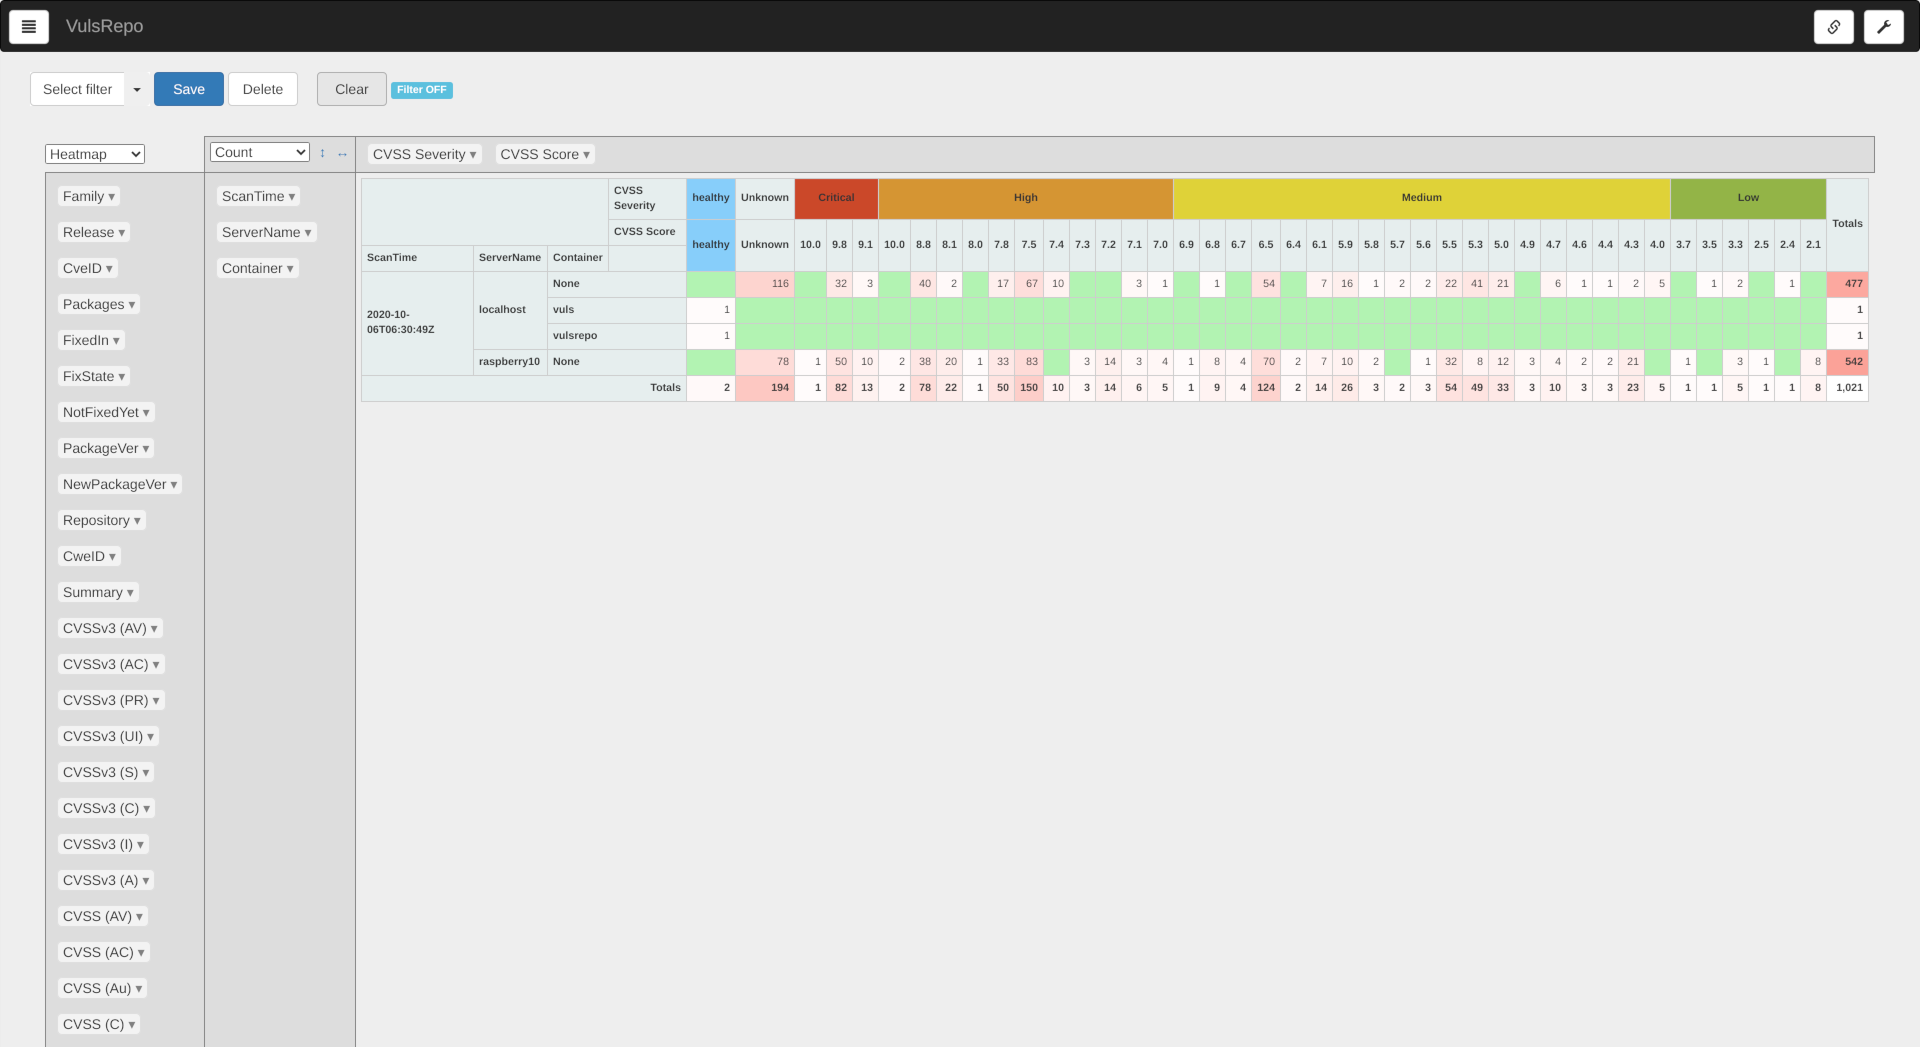
ピボットテーブル
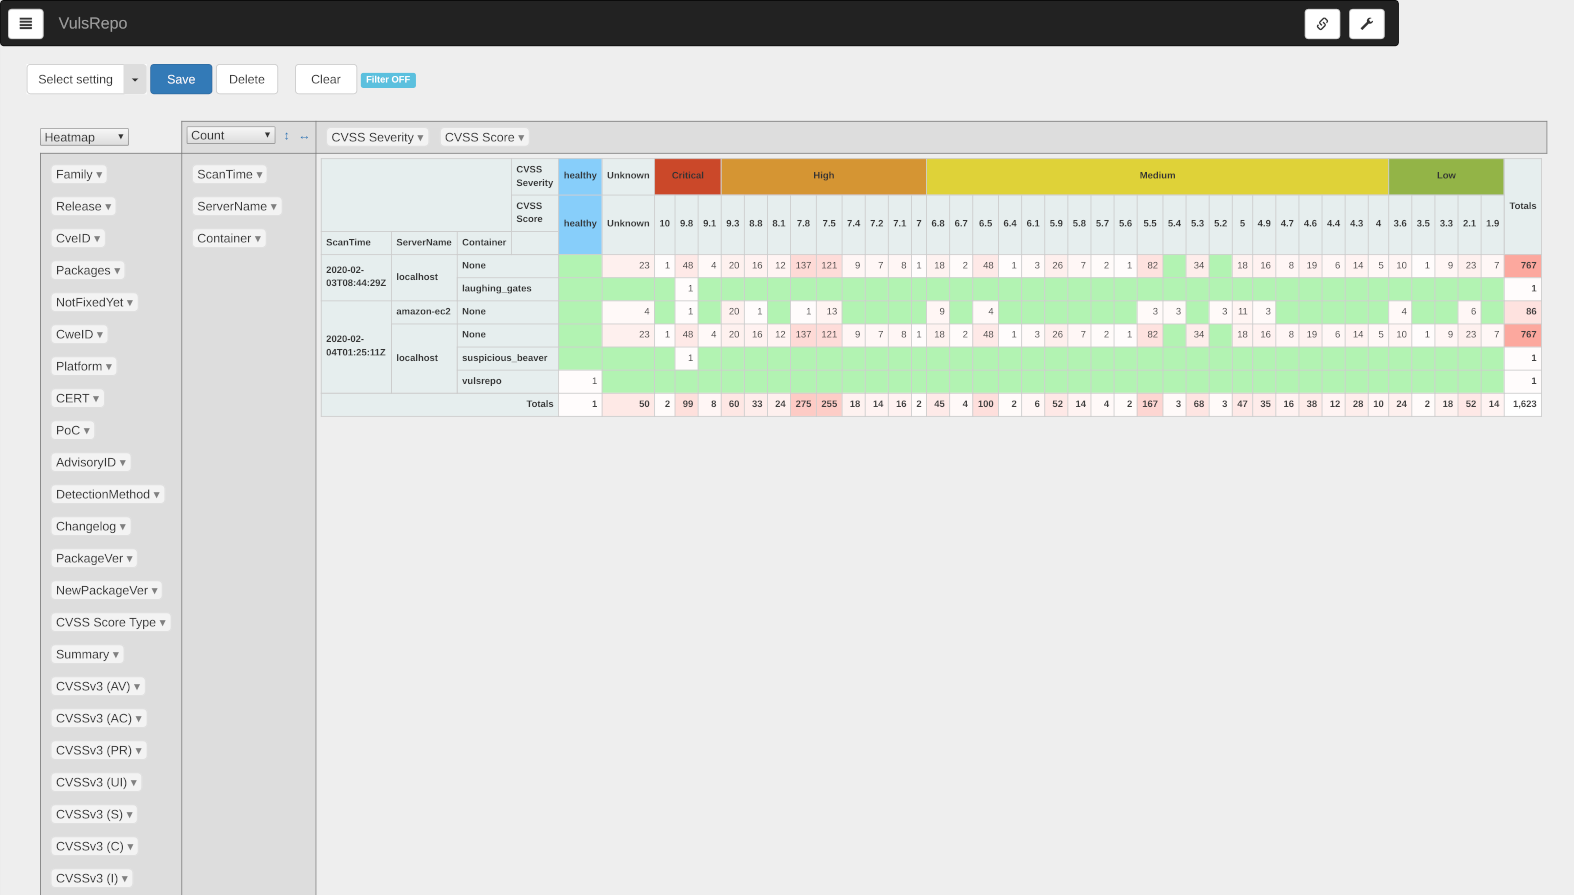
フィルター未適用の初期状態
The number of vulnerabilities found by date/time and server/container scanned is shown as a heat map by severity.
The healty indicates that no vulnerabilities were found.
フィルターの操作
既存フィルターの適用
When you change a filter in the pull-down menu, you can apply a pre-defined filter to display a pivot table.
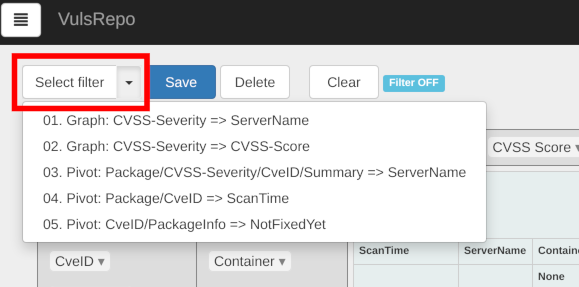
プリセットフィルター
There are five available.
- 01. Graph: CVSS-Severity => ServerName
- 02. Graph: CVSS-Severity => CVSS-Score
- 03. Pivot: Package/CVSS-Severity/CveID/Summary => ServerName
- 04. Pivot: Package/CveID => ScanTime
- 05. Pivot: CveID/PackageInfo => NotFixedYet
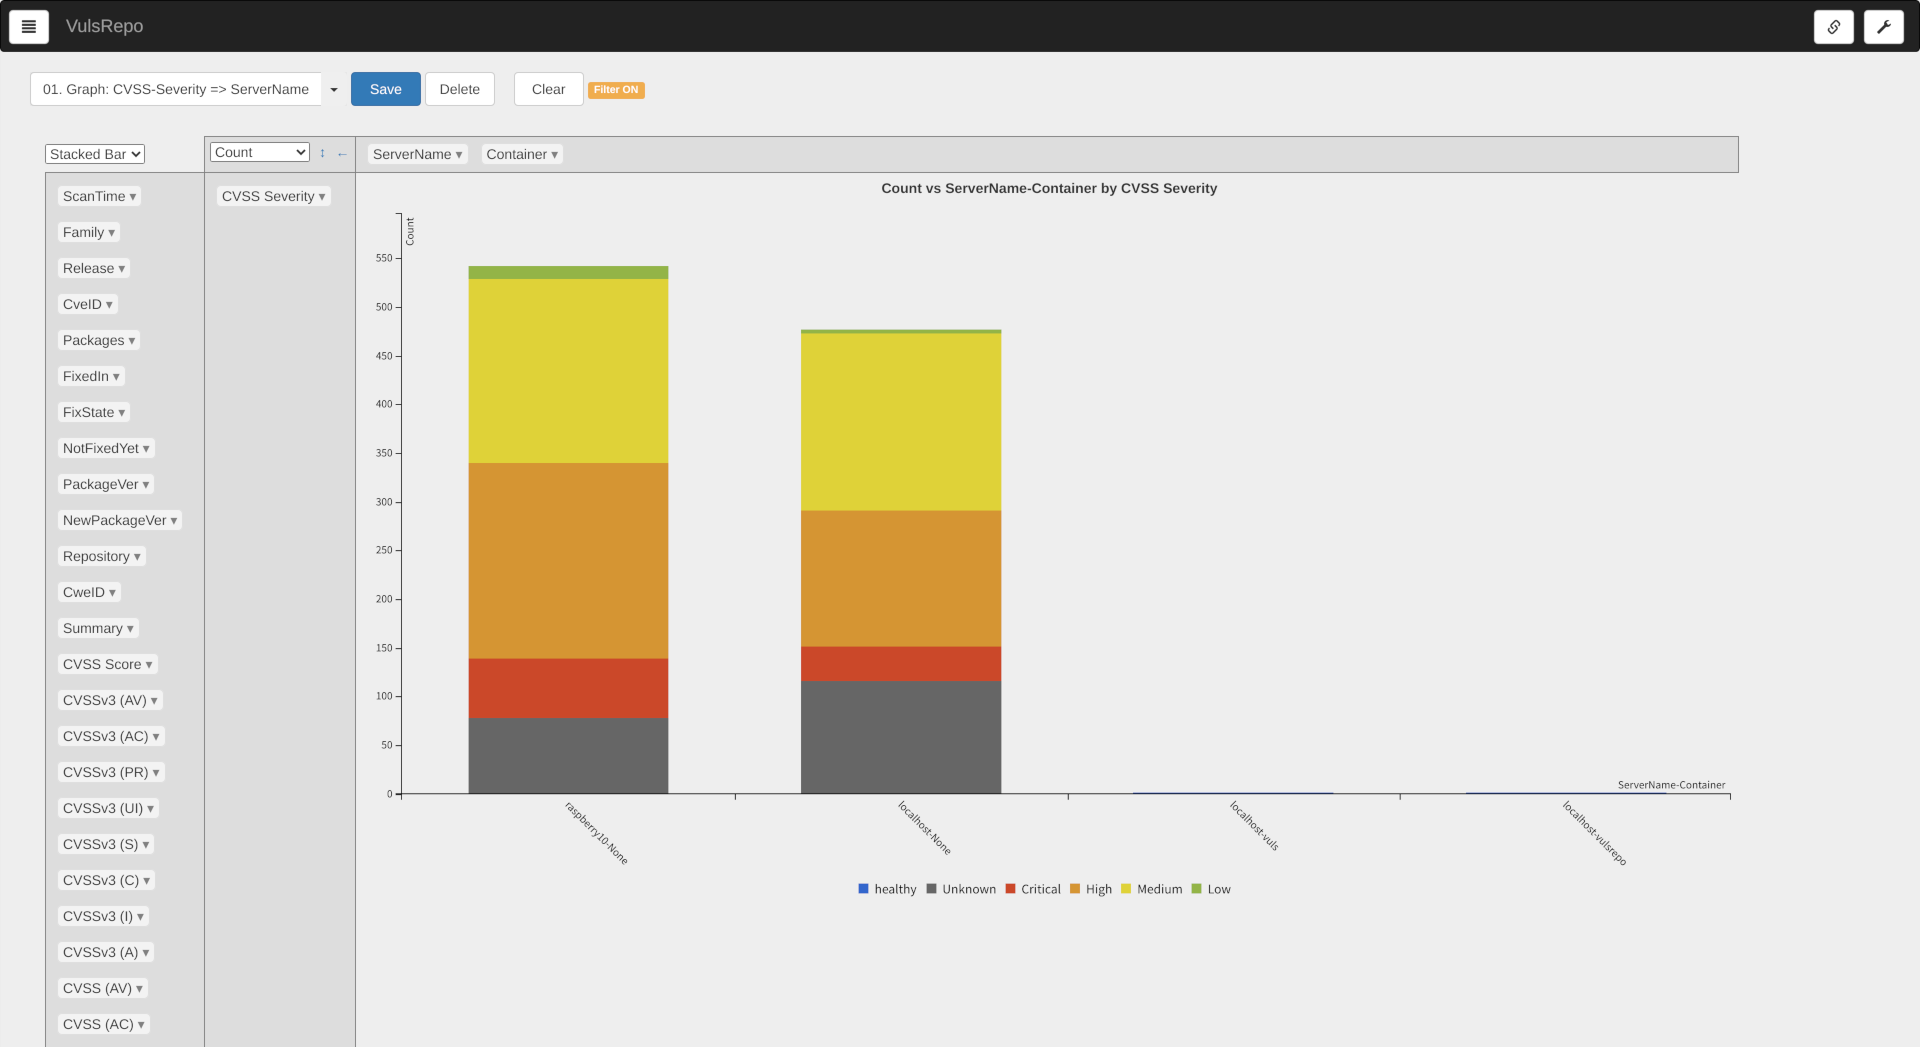
01. Graph: CVSS-Severity => ServerName
A bar chart stacking the total number of vulnerabilities detected per server and container.
The most recent data is selected for a side-by-side comparison of the status of each server and container.
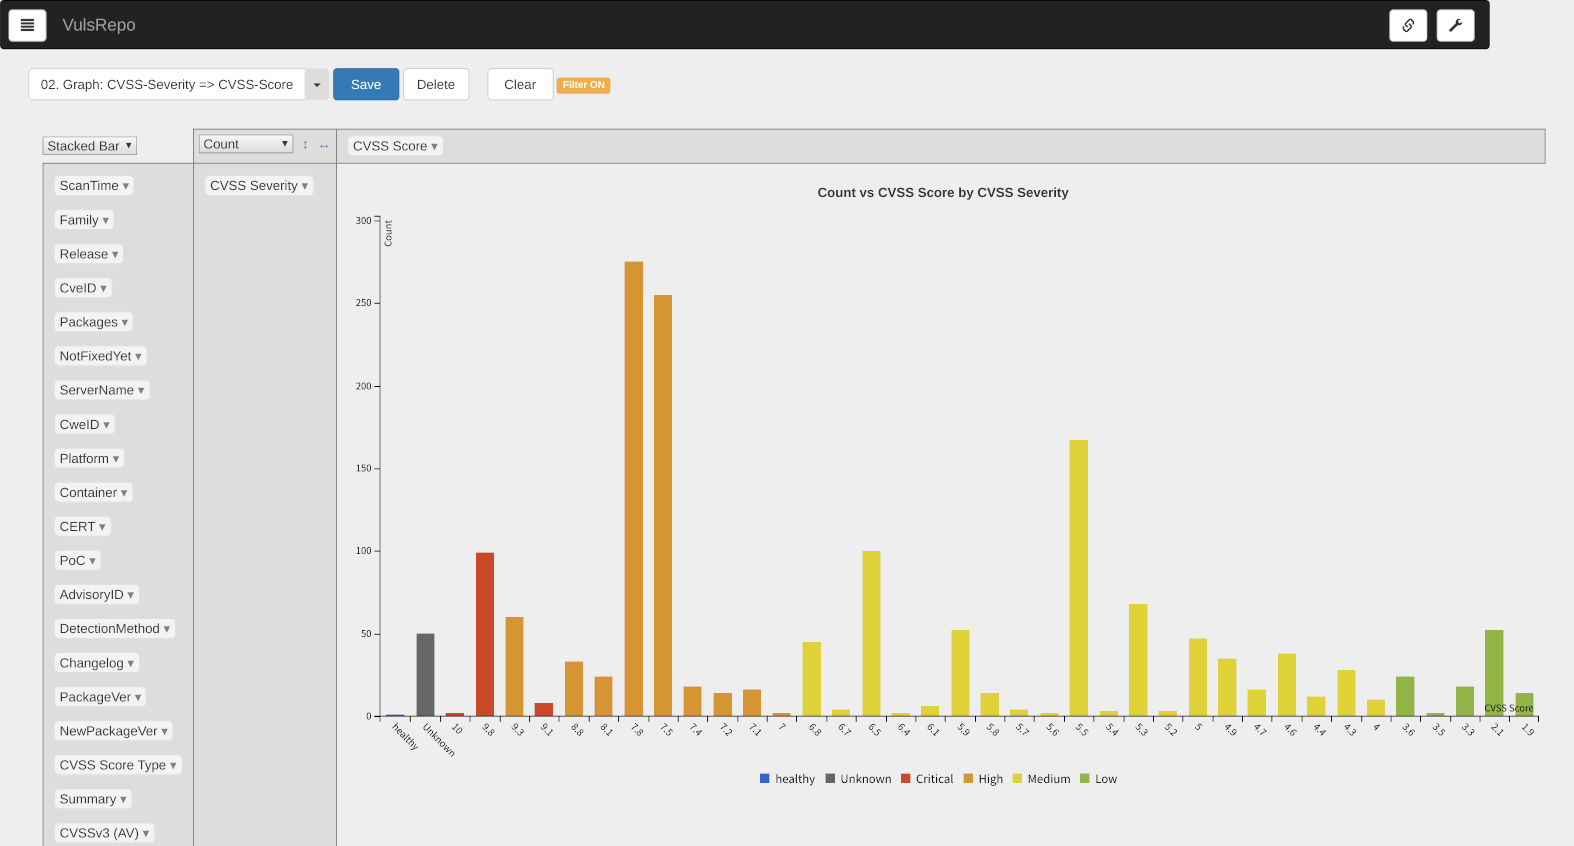
02. Graph: CVSS-Severity => CVSS-Score
This bar graph shows the total number of vulnerability detections for each CVSS base score.
It is recommended that the most recent data be selected for display.

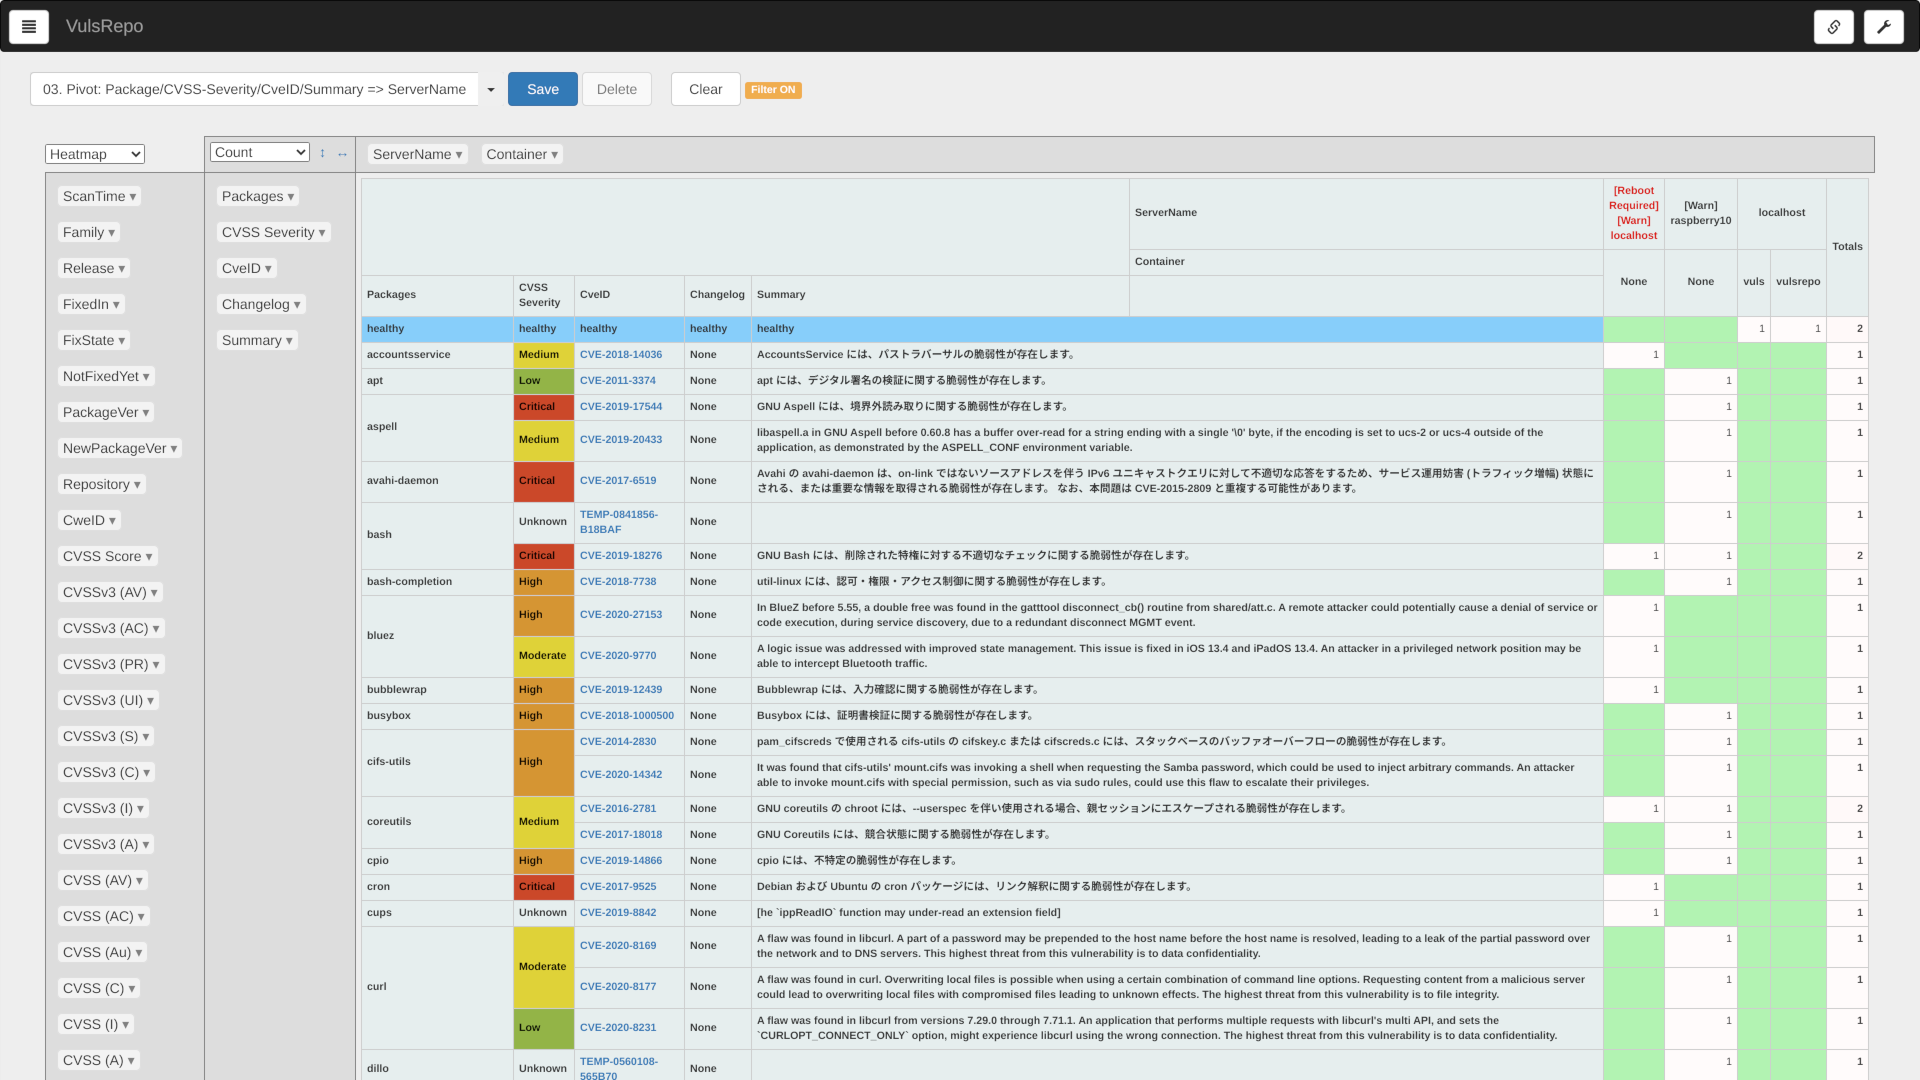
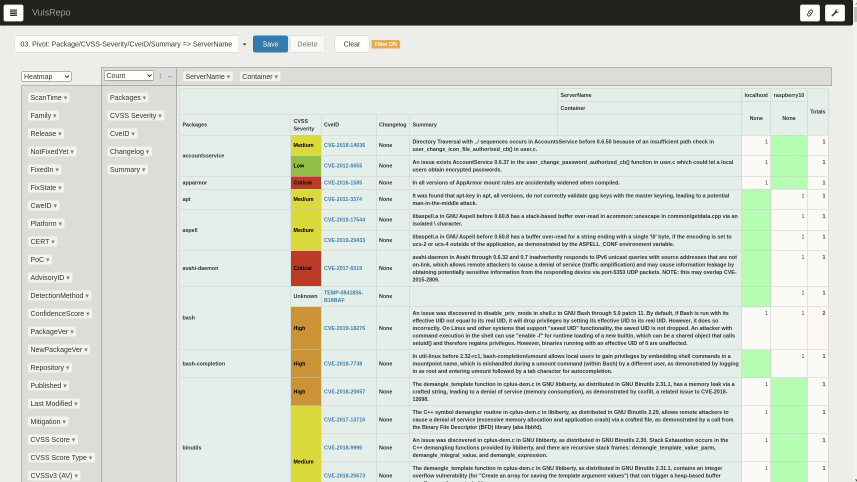
03. Pivot: Package/CVSS-Severity/CveID/Summary => ServerName
A heat map of the packages where the vulnerability was found, the severity, the corresponding CVE IDs, a summary of the vulnerability, and the total number of detections by server and container.
It is suitable for comparing the status of each server and container side by side by selecting the most recent data.
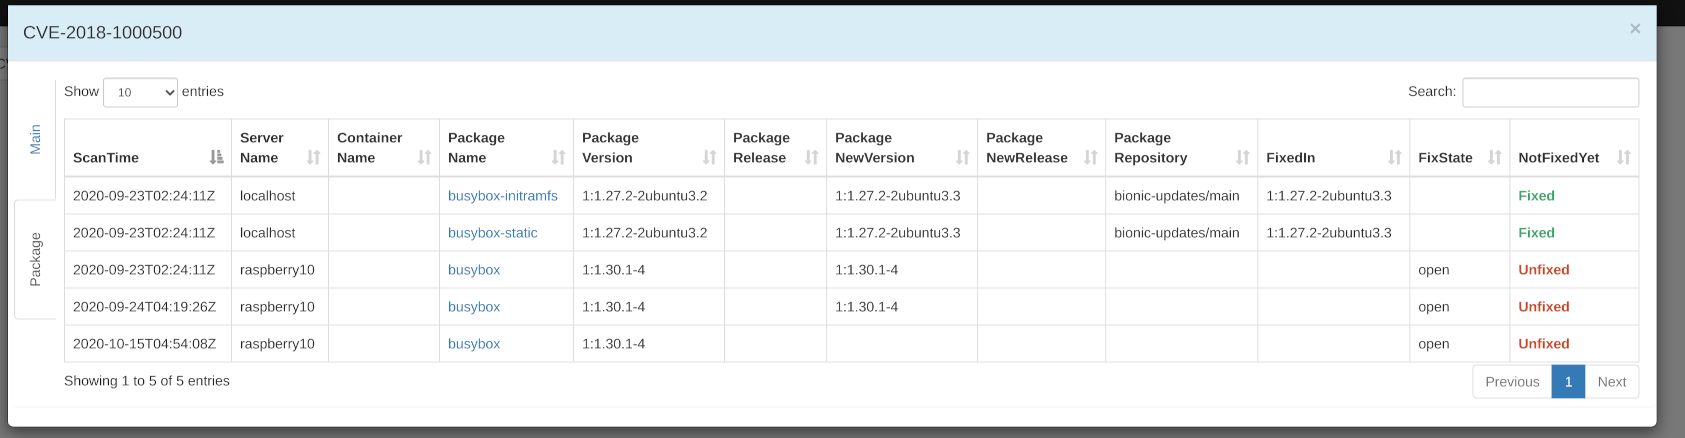
04. Pivot: Package/CveID => ScanTime
Good for checking whether each CVE ID vulnerability is resolved or newly detected.
Suitable for comparing a single server or container over time.

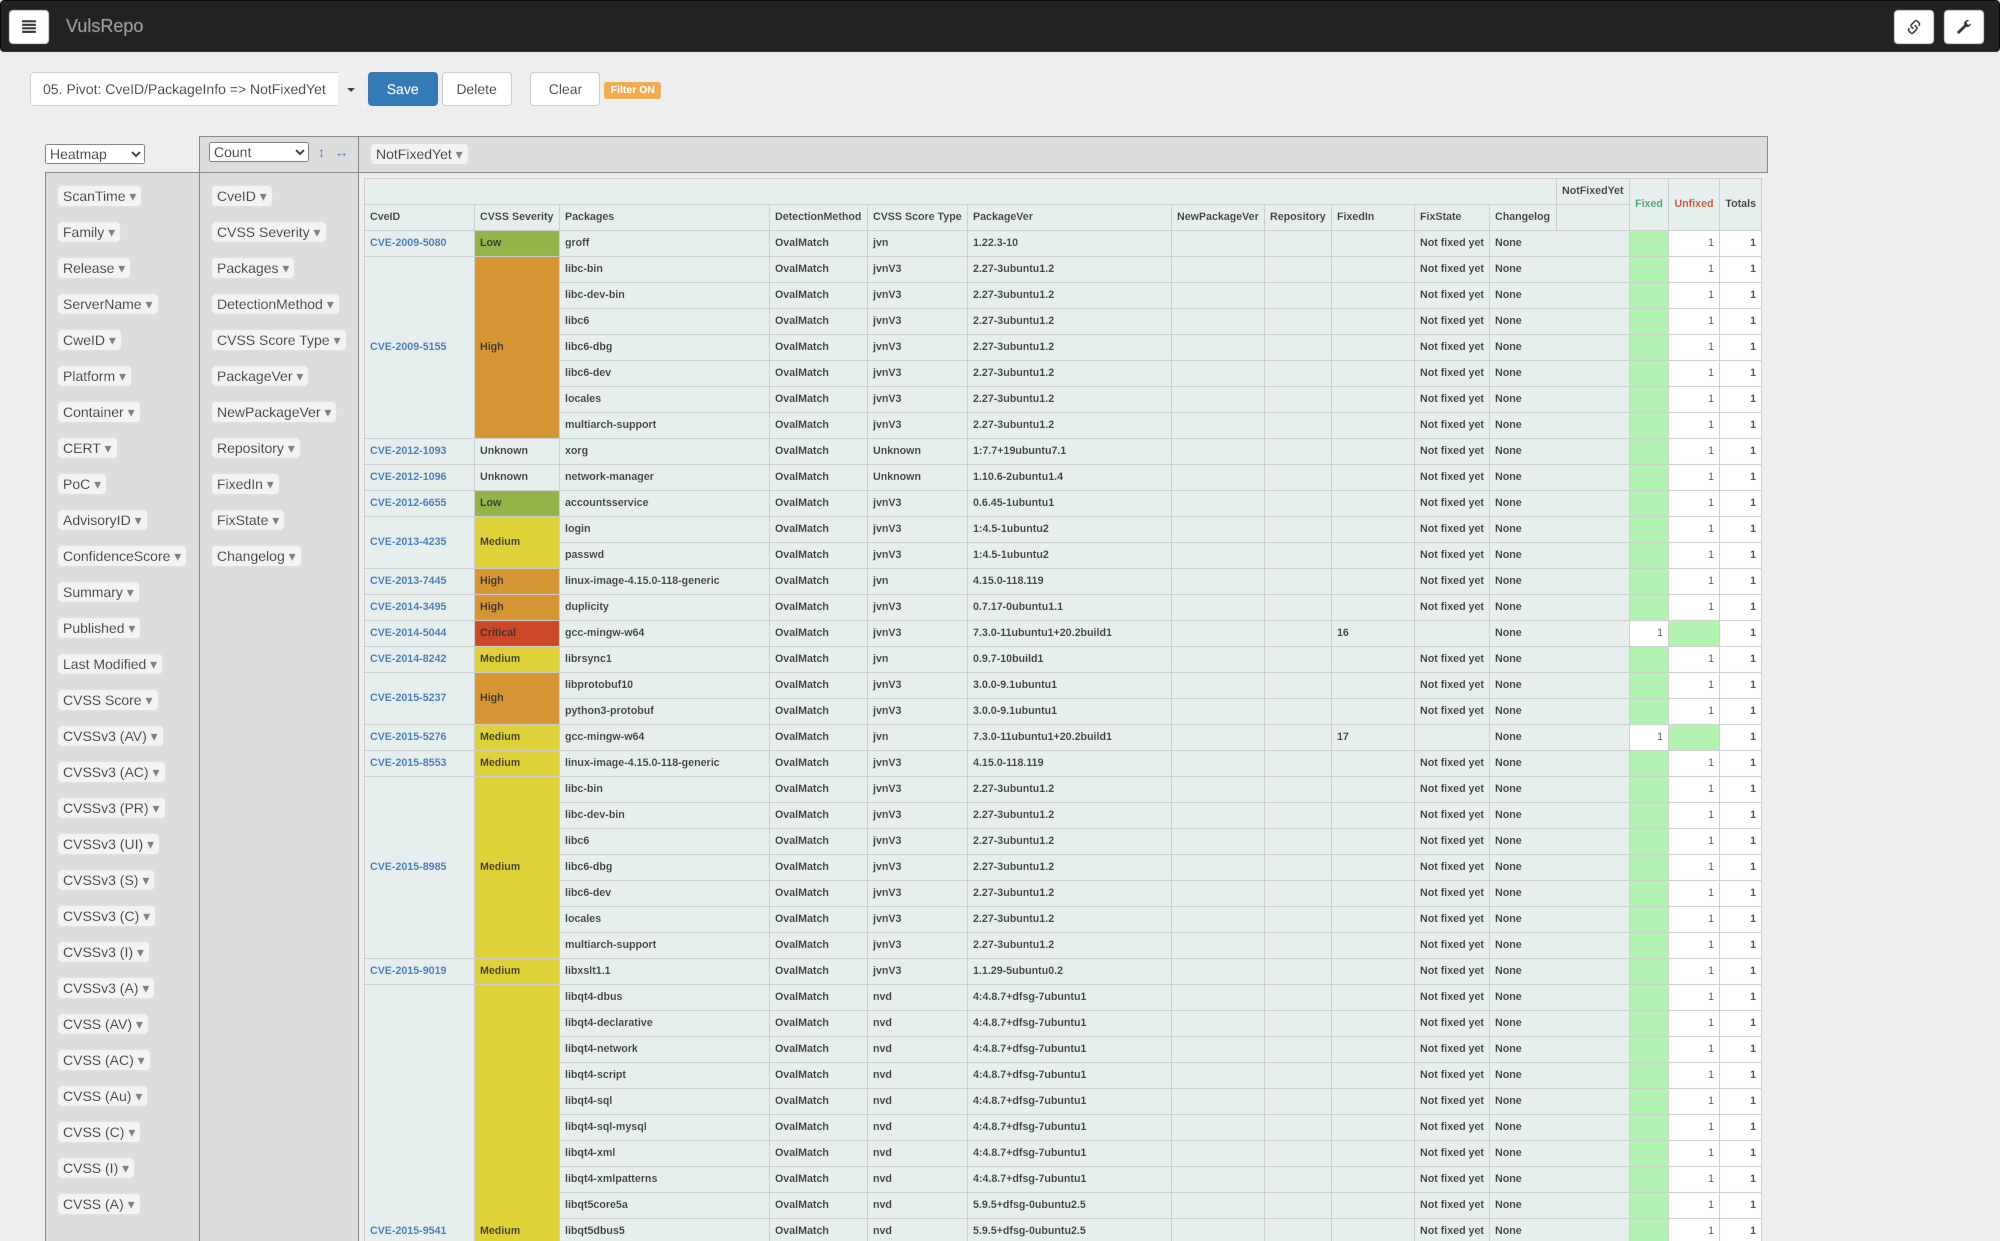
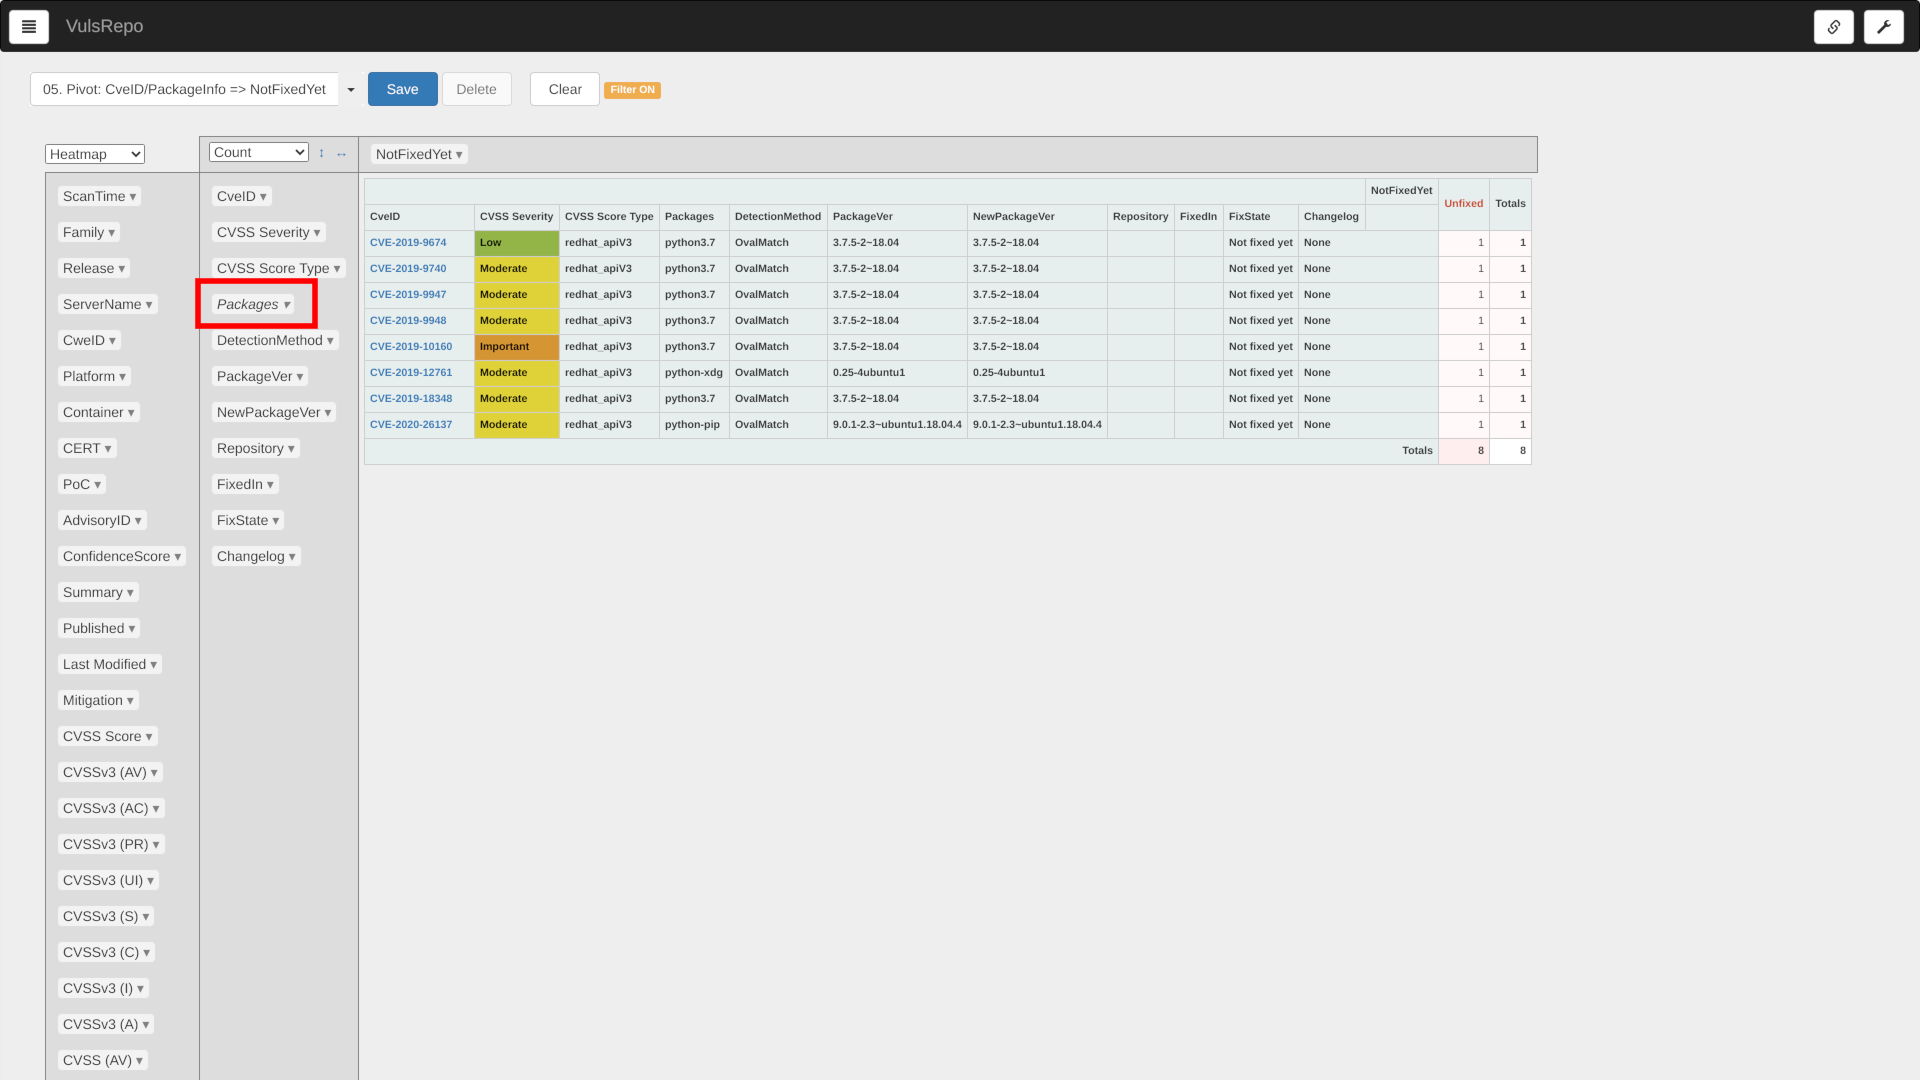
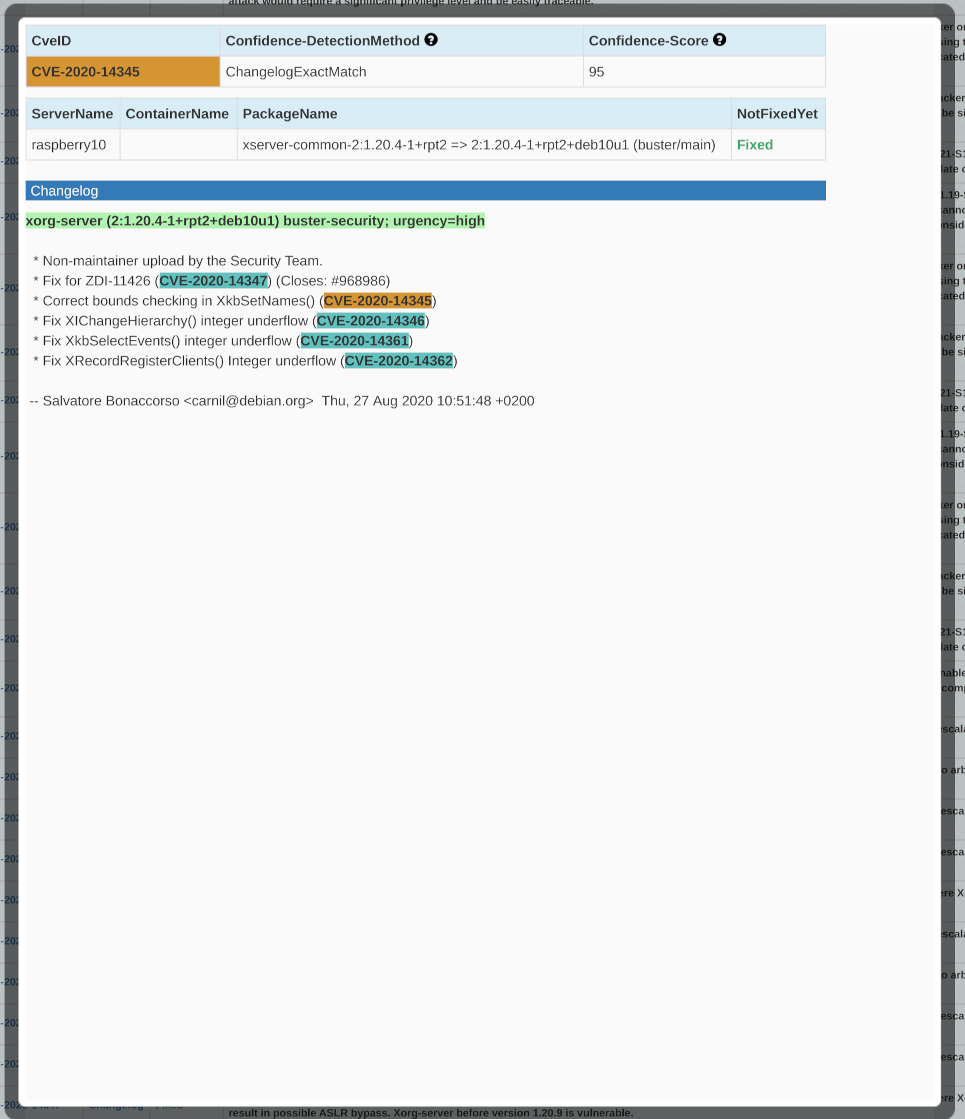
05. Pivot: CveID/PackageInfo => NotFixedYet
This is a good time to check if a fixed version is provided in the package that contains each CVE ID vulnerability.
You can choose the most recent single server or container to check.
表示項目の追加・削除・並び替え
You can change the display items by dragging and dropping them.
フィルターの新規保存、上書き保存
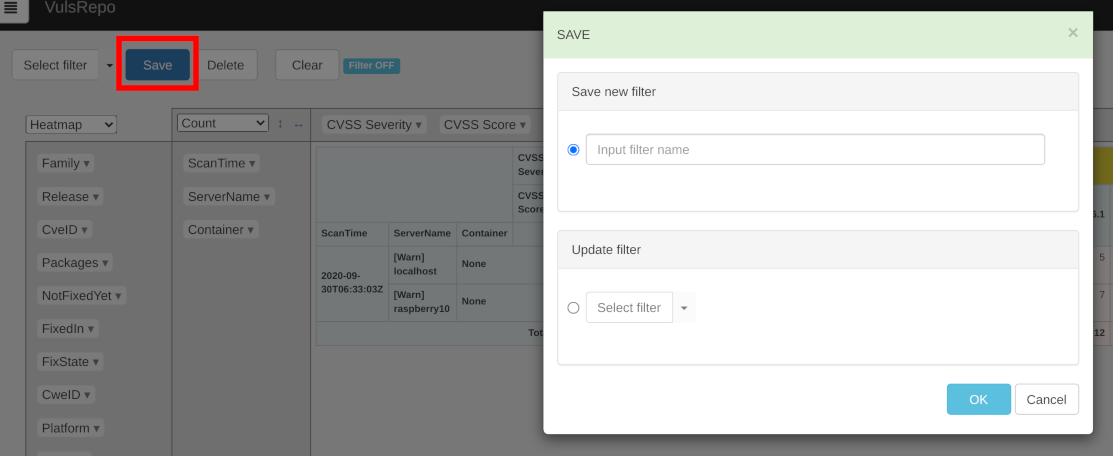
You can save the filtered items and reorder them. Press the Save button to open the Save Filter Panel.
- To save a new filter, select
Save new filterand enter the name of the filter you want. - If you want to overwrite an existing filter, choose
Update filterand select the filter you want to overwrite from the pull-down menu. - Press the
OKbutton to save, or theCancel,xor ESC key to cancel.
You can't overwrite Preset filters.
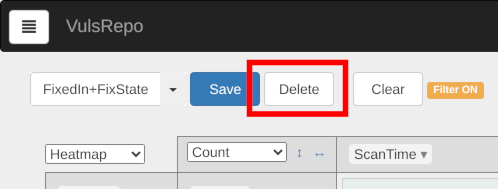
フィルターの削除
Press the Delete button to delete the current filter.
The Are you sure to delete? confirmation dialog is displayed. Press the OK button to delete the filter, or the Cancel button to cancel.
You can't delete Preset filters.
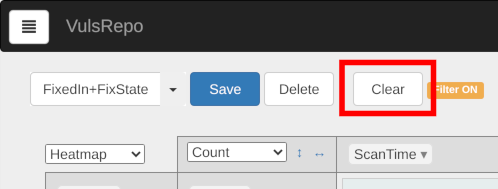
フィルターのクリア
Pressing the Clear button clears the filter and returns the pivot table display to Unfiltered initial state.
Press the Open print preview button to open print preview window.
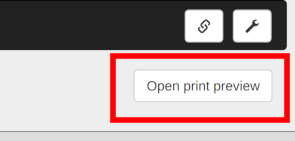
You can print by pressing the Print button.
各項目の説明
| 項目 | 説明 |
|---|---|
| ScanTime | スキャンした日時 |
| ServerName | スキャン対象サーバー名 |
| Container | スキャン対象コンテナ名 |
| CVSS Score | CVSS Base score of vulnerability, with a maximum of 10.0. |
| CVSS Severity | Vulnerability severity. Red is more severe. |
| CVSS Score Type | The source of CVSS Score, CVSS Severity and CVSS Vector. For example, see CVSS Score Type |
| Platform | 稼働しているプラットフォーム |
| Family | OS |
| Release | OS リリースバージョン |
| Errors | Vuls Error Messages |
| Warnings | Vuls warning messages, which include OS EOL information in Vuls v0.15.x and later. |
| Diff | (Only when Vuls v0.15.8 or later is used to output diff information) + New vulnerabilities found compared to previous scan - Vulnerabilities that are no longer present (or have been addressed) since the last scan |
| CveID | The CVE ID assigned to the vulnerability. Click to view Detail panel. |
| Packages | The name of the package containing the vulnerability |
| FixedIn | The version of the package that fixed the vulnerability |
| FixState | Status of packages against vulnerabilities |
| NotFixedYet | Whether a version of the package that fixes the vulnerability is available. |
| PackageVer | Installed package version |
| NewPackageVer | Latest Package Version |
| Repository | Package provider's repositories |
| CweID | Its CVE's CWE - Common Weakness Enumeration. Click on MITRE or JVN to view the appropriate CWE description page in a new window. |
| VulnType | (WordPress only) Vulnerability type provided by WPScan. |
| Status | (WordPress theme and plugin only) Whether a WordPress theme or plugin is active or inactive. |
| Update | (WordPress theme and plugin only) Availability of updates for WordPress themes and plugins. |
| Title | Vulnerability title |
| Summary | Vulnerability Overview |
| PortScannable | Whether the port can be scanned or not. Click to view Package panel. |
| Process | The process ID: process name of the process affected by the vulnerability. Click to view Package panel. |
| Path | The path of the lock file that led to the vulnerability scan of the library. |
| Mitigation | Whether or not information on mitigation measures is available. |
| CVSSv3(*) | CVSS 3.0 Vector |
| CVSS(*) | CVSS 2 Vector |
| AdvisoryID | (Amazon Linux, RedHat, Oracle Linux only) Advisory IDs for supported distributions. Click to open the advisory page in a new window. |
| CERT | Whether there is a USCERT Alert or JPCERT Alert. Click to view the relevant information in a new window. |
| PoC | Whether the exploit code exists. If so, the number of them. |
| Changelog | Whether or not there is a Changelog. Click to view Package panel. |
| DetectionMethod | Vulnerability Detection Methodology |
| ConfidenceScore | Reliability of detection. 100 means high reliability. |
| Published | Date the information was released. |
| Last Modified | Date the information was last updated. |
CVSS Score Type
Here are some examples.
| Value | Source |
|---|---|
nvdV3 | NVD CVSS v3 |
nvd | NVD CVSS v2 |
jvnV3 | JVN CVSS v3 |
jvn | JVN CVSS v2 |
redhat_apiV3 | RedHat CVSS v3 |
oracleAdvisory | Oracle Linux Errata repository |
Unknown | Unknown |
項目ごとのフィルタリング
Press the ▼ part of the item.
Select the items to be displayed by checking or unchecking the checkboxes. Click Select All to select them all together, or Select None to clear them.
If you have a lot of candidates, you can refine your selection. The following example shows how to filter by python and select some packages.
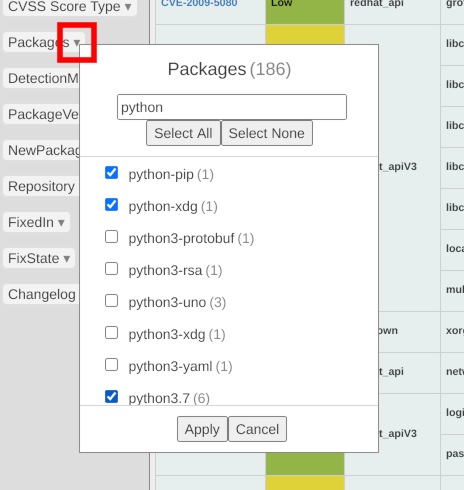
Press the Apply button to apply it. Filtered items are shown in italics. To close it without applying it, press the Cancel button.
ソート
The leftmost row is the highest priority for sorting.
| 項目 | Ascending/descending order |
|---|---|
| CVSS Score | descending order |
| CVSS Severity | Unknown, Critical, High, Important, Medium, Moderate, Low, Negligible, Unimportant, Pending, Not Vulnerable |
| CVSSv3(*) | descending order |
| CVSS(*) | descending order |
| CERT | descending order |
| PoC | descending order |
| Published | descending order |
| Last Modified | descending order |
| Other | ascending order |
The order of ascending and descending is fixed and cannot be switched.
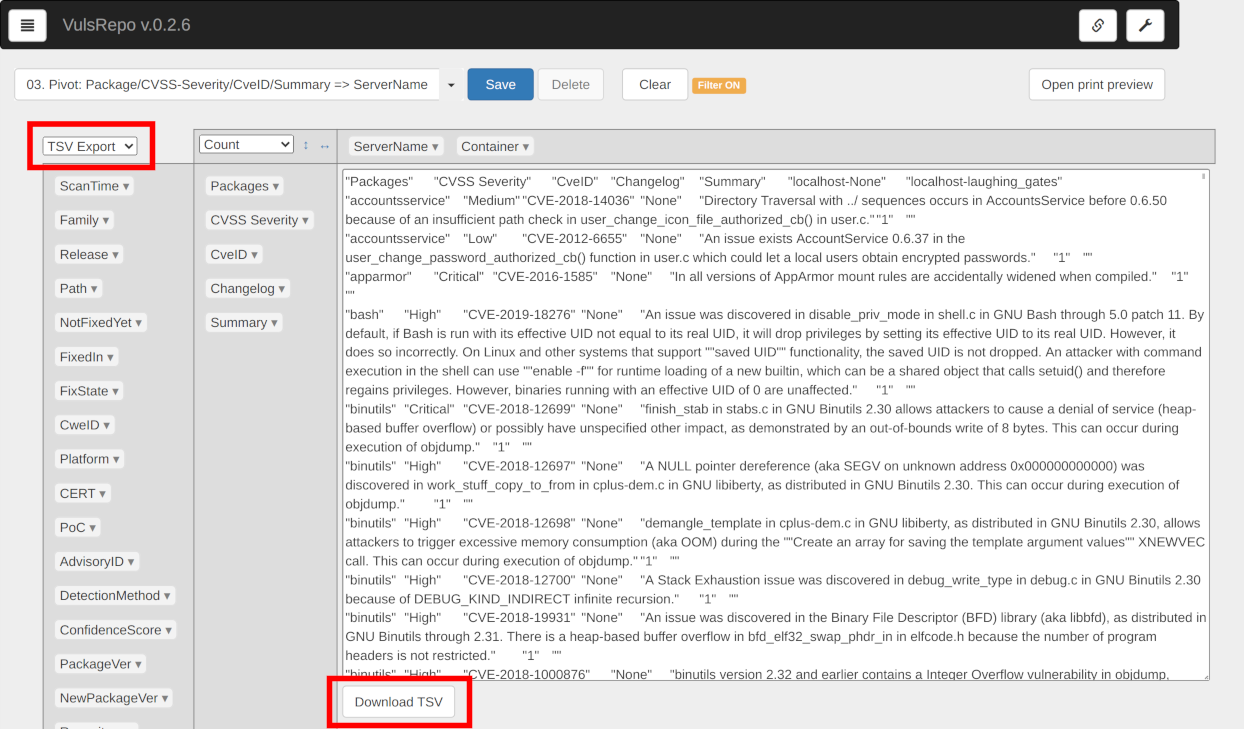
TSV Export
You can render TSV data by setting the renderer to TSV Export. The displayed data can be copied to the clipboard. You can also download the data as a TSV file by pressing the Download TSV button.
Other pivot table operations
You can change the renderer, the unit of aggregation, and the sort order of rows and columns of aggregate values.
See pivottable wiki and PivotTable.js Examples.
ヘッダー上ボタン
Re-selecting the data to be displayed
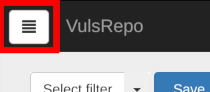
Press ☰ button at the top left of the screen to display the file selection tree. Press again to close the tree.
Press this button to select the data to be displayed.
Display setting
Press the wrench button in the upper right corner of the screen to open the Display Settings Panel.
The settings are applied by pressing x or clicking outside the panel frame or pressing the ESC key to close the panel.
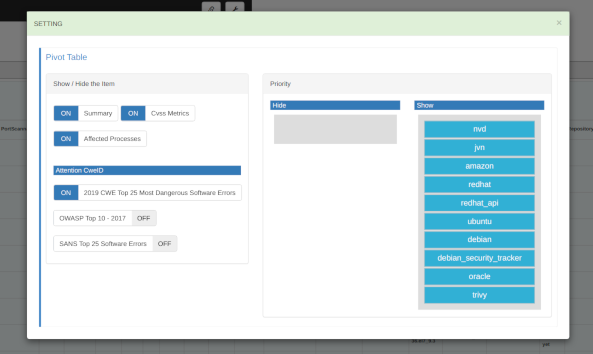
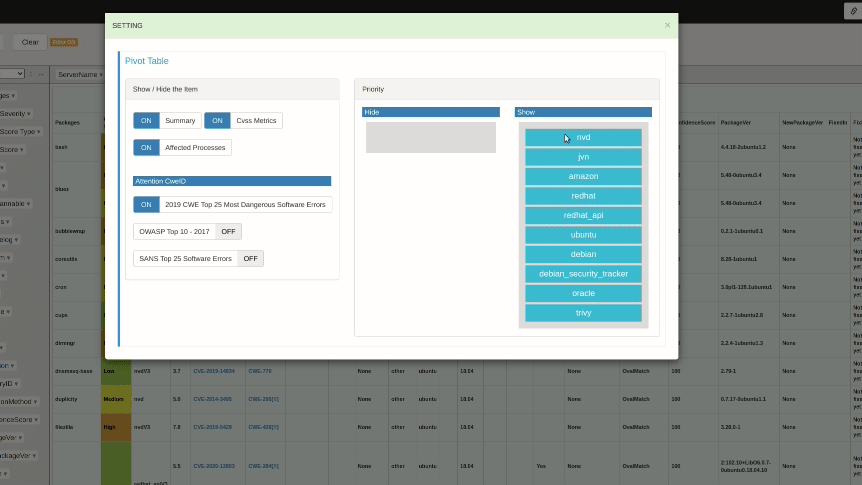
Show / Hide the Item
Set the items to be displayed in the Pivot table. Because the data of Summary, CVSS Metrics and Affected Processes(PortScannable, Process) is very large, an error may occur if the number of vulnerabilities is large. In this case, setting OFF may improve the situation.
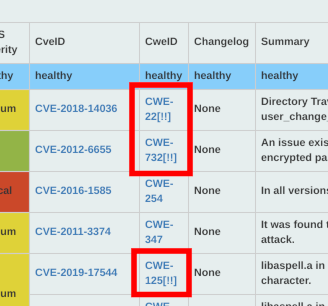
Attention CweId
If any of the following is applicable to the CweId of the pivot table, the CWE ID will be marked with a caution symbol by setting it to ON.
Priority
Set the data to be displayed with priority in the pivot table.The default is NVD data.
You can swap priorities by dragging and dropping blocks. You can also swap what you want to show and what you want to hide. In the following example, the priority of JVN and Ubuntu is raised so that Japanese and Ubuntu information is shown first. We also move amazon, oracle to the Hide side to hide information about Amazon Linux and Oracle Linux.
Share filter and display settings
Filters and display settings are stored in the Local Storage of each browser, not on the server side. Therefore, if more than one person needs the same filter and display settings, you will need to share them with others.
Sender's Operation
- Click the `
x` を押すか、パネル枠外をクリックしてパネルを閉じてください。

Recipient's Operation
- ブラウザでコピーした URL にアクセスしてください。
- 必要に応じて URL をブックマークしてください。ブックマークから VulsRepo を開くことで次回以降も同じ設定で表示できます。
- 表示対象データを選択すると、
ピボットテーブル は同様の設定で表示できます。
- 必要に応じて、 フィルターの新規保存、上書き保存 してください。
詳細パネル
Detailed information is divided into Main tab and Package tab. The initial view is Main tab. Click on the tabs to switch the display to suit your needs.
To close the panel, press x on the top right corner of the panel, or click outside the panel frame, or press ESC key.
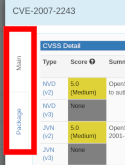
Main tab
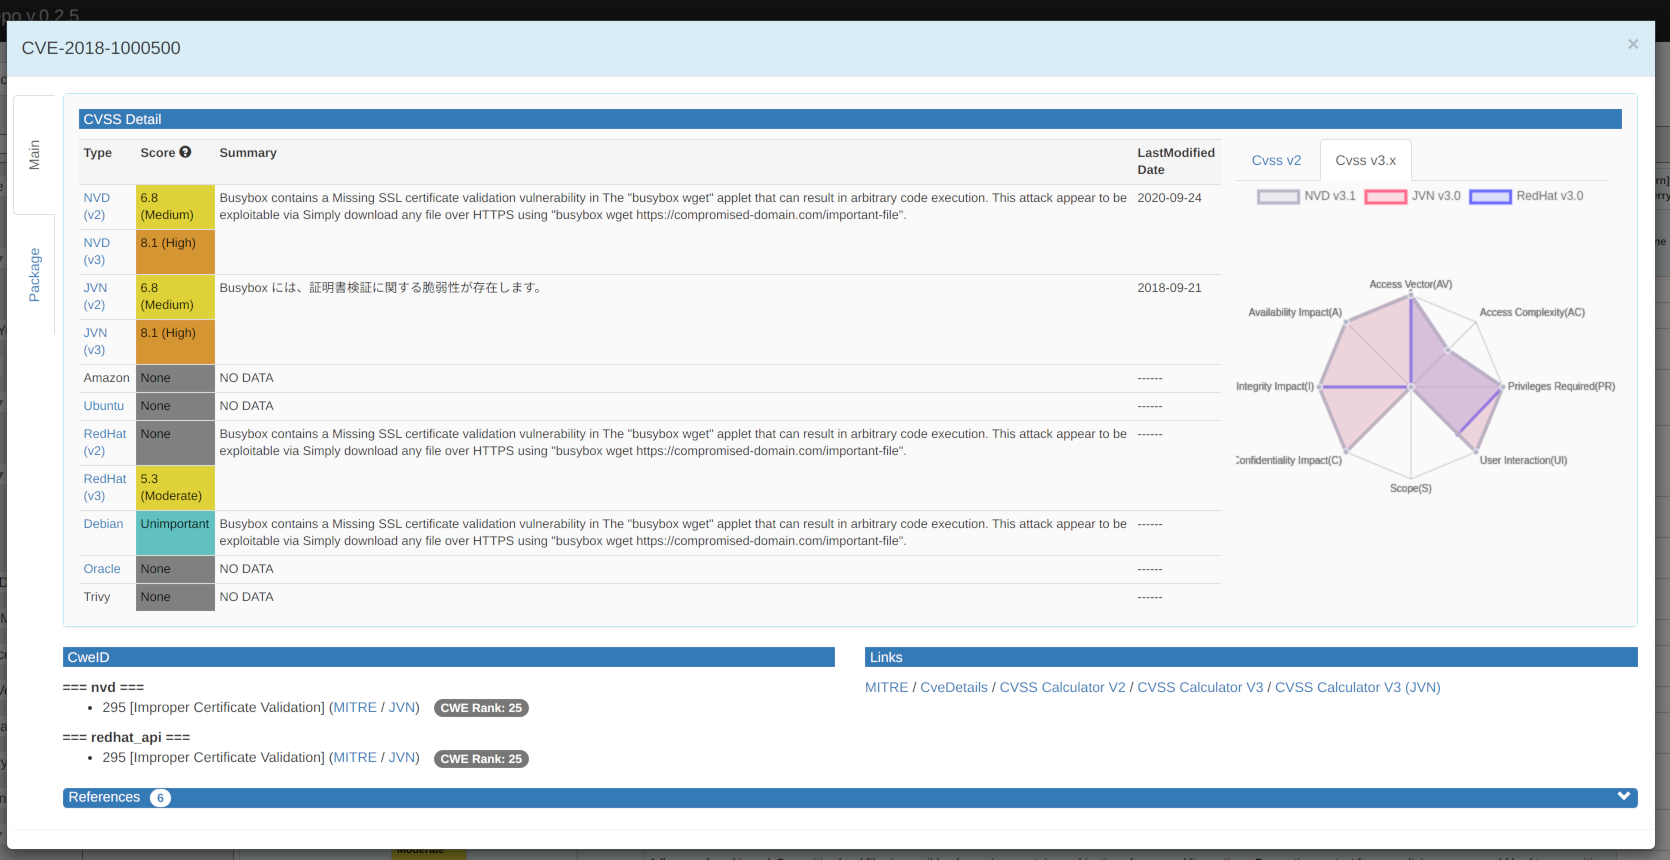
CVSS Detail section
This section shows the basic score and severity, summary of the vulnerability, and the date the information was last updated, as provided by each organization and distributor.
Clicking each type opens the page provided by the organization or distributor in a new window.
See the tooltip of ? tooltips for basic score and severity categories.
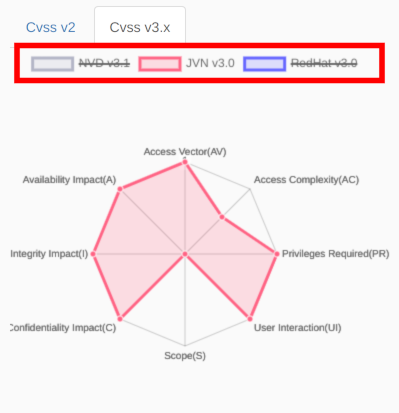
CVSS Vector radar chart
It shows the value of each evaluation item calculated by NVD, JVN, and RedHat in a radar chart. You can switch between the CVSS v2 and CVSS v3.x charts by clicking the Cvss v2 tab or the Cvss v3.x tab. The initial display is CVSS v3.x.
You can control to show or hide the chart by clicking the NVD v3.x, JVN v3.x, or RehHat v3.x. In the following example, the chart of NVD v3.1 and RehHat v3.0 is hidden.
Mitigation section
This section will appear if information on mitigation measures is available. Click on the header to open and close the section.

CweID section
By clicking on MITRE and JVN, a new window will open with the appropriate CWE details Display the description page.
If CweID is ranked in one of the following categories, the rank will be displayed as a badge. Clicking on a badge will take you to a new window for each piece of information.
Links section
Open the following page in a new window.
Item Link MITRE The corresponding CVE page provided by MITRE CveDetails The corresponding CVE page provided by CVE Details CVSS Calculator V2 Common Vulnerability Scoring System Calculator Version 2 page from NISTCVSS Calculator V3 Common Vulnerability Scoring System Calculator Version 3.0 page from NISTCVSS Calculator V3 (JVN) Common Vulnerability Scoring System Version 3.0 Calculator page provided by JVN. Amazon (Amazon Linux only) Amazon Linux Security Advisories, Amazon Linux2 Security Advisories, Amazon Linux2022 Security Advisories, Amazon Linux2023 Security Advisories RedHat Network (RedHat only) Red Hat Product Errata OracleLinux Errata (Oracle Linux only) Unbreakable Linux Network
CVSS Calculator is useful for calculating severity, including Environmental Metrics.
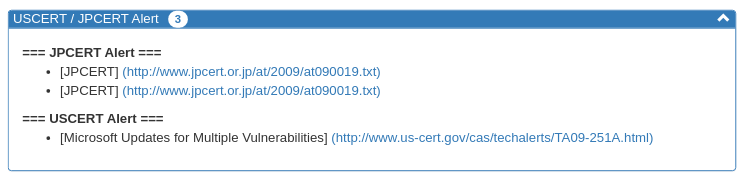
USCERT / JPCERT Alert section
If there is USCERT Alert or JPCERT Alert, USCERT / JPCERT Alert section appears. Click on the header to open and close the section. Shows links to USCERT Alert and JPCERT Alert. Clicking on them will open the page in a new window.
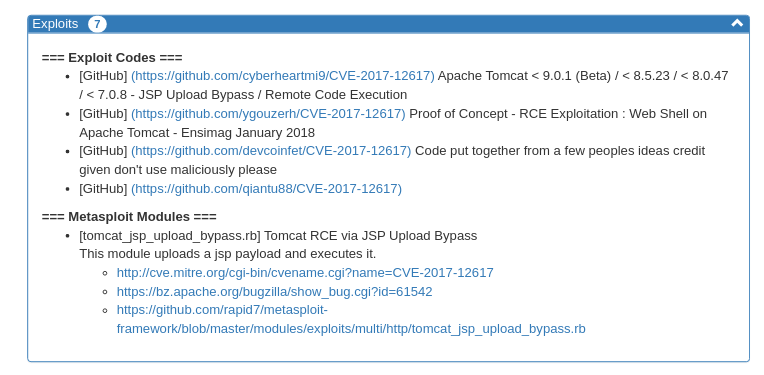
Exploits section
Exploits section is displayed if there is information on Exploit Codes or Metasploit Modules. Click on the header to open and close the section. Displays links for each Exploit Codes and Metasploit Modules. Clicking on them will open the page in a new window.
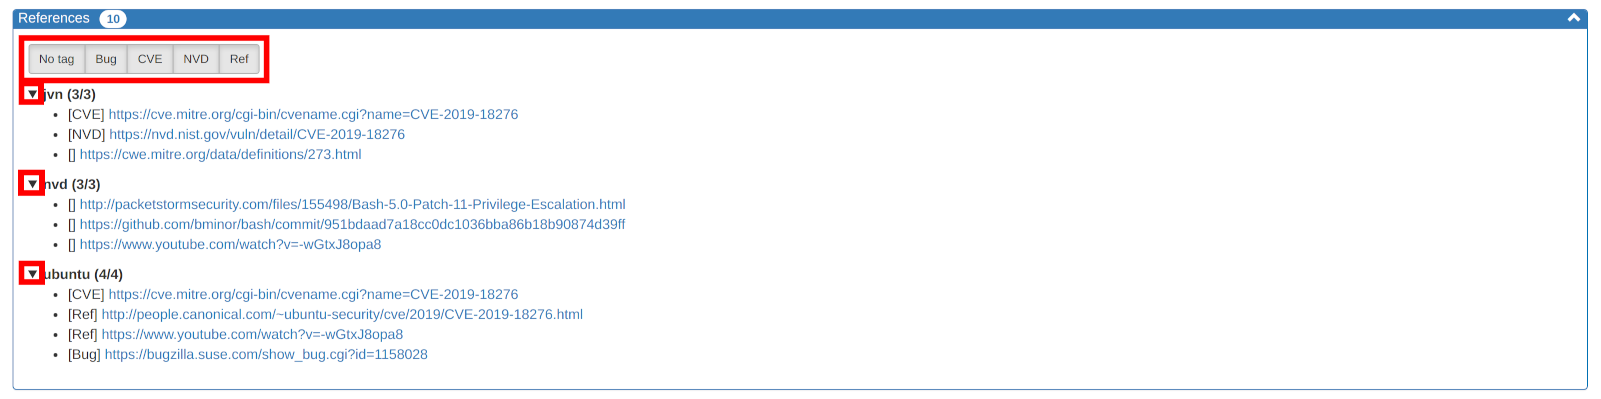
References section
Click on the header to open and close the section. Displays the reference information provided by each information organization and distributor. Clicking on them will open the page in a new window.
You can filter by tags. Clicking on a tag toggles it on and off. The default is Show All. You can open and close the display for each information source. Click on the ▼ button. The default is open.
Package tab
Here is a list of packages that contain vulnerabilities. Click each PackageName to open the Package panel.
Package panel
To close the panel, click outside the panel frame or press the ESC key.
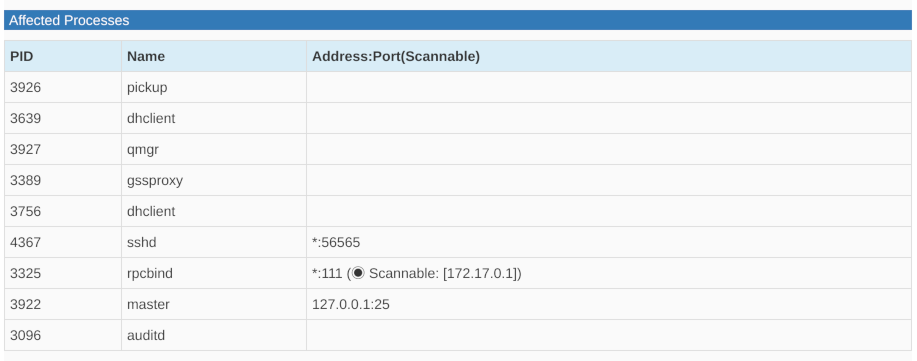
Affected Processes
If there are processes affected by the vulnerability, they will be shown. Lists the process ID, process name, IP address and port.
Changelog
View the package changelog.
The changelog description is highlighted in orange if the corresponding CVE ID is present. Any other CVE IDs are highlighted in light blue.
URL parameters
You can filter the target data and display it immediately by specifying the date, server and filter by URL parameters. If you already know the period, server and filter you want to view, you can specify these parameters in the URL when you open VulsRepo, saving you the trouble of manually selecting them each time.
The following parameters can be specified.
Parameter Purpose Value server Target server (container) For all, all. If more than one, concatenate them with +. ex)foo.json, [email protected] daterange Date Range today, yesterday, last7days, last30days, thismonth, lastmonth or alldaysdatefrom Date Range from (*) YYYY-MM-DD format ex)2020-11-01 dateto Date Range to (*) YYYY-MM-DD format ex)2021-01-23 time Specific date and time ISO8601 format ex) 2020-02-04T01:25:11Z or 2021-01-25T12:34:56+09:00 filter Specifying a filter Filter name. If not specified, no filter ex) 01.%20Graph:%20CVSS-Severity%20=>%20ServerName
(*) datefrom and dateto must be specified as a set.
Priority of date-related parameters
High daterange > datefrom and dateto > time Low
If none of these are specified, the latest date will be set.
Examples
Here are some examples.
localhost.json of the latest date
http://<server-address>:5111/?server=localhost.json
localhost.json and raspberry10.json for the last 30 days
http://<server-address>:5111/?daterange=last30days&server=localhost.json+raspberry10.json
All servers (containers) from 2020-09-18 to 2020-11-16
http://<server-address>:5111/?datefrom=2020-09-18&dateto=2020-11-16&server=all
localhost.json on 2020-02-04T01:25:11Z
http://<server-address>:5111/?time=2020-02-04T01:25:11Z&server=localhost.json
localhost.json and [email protected] on 2020-02-04T01:25:11Z
http://<server-address>:5111/?time=2020-02-04T01:25:11Z&[email protected]
localhost.json on 2020-02-04T01:25:11Z with 01. Graph: CVSS-Severity => ServerName filter
http://<server-address>:5111/?time=2020-02-04T01:25:11Z&server=localhost.json&filter=01.%20Graph:%20CVSS-Severity%20=%3E%20ServerName
localhost.json on 2020-02-04T01:25:11Z with 02. Graph: CVSS-Severity => CVSS-Score filter
http://<server-address>:5111/?time=2020-02-04T01:25:11Z&server=localhost.json&filter=02.%20Graph:%20CVSS-Severity%20=%3E%20CVSS-Score
localhost.json on 2020-02-04T01:25:11Z with 03. Pivot: Package/CVSS-Severity/CveID/Summary => ServerName filter
http://<server-address>:5111/?time=2020-02-04T01:25:11Z&server=localhost.json&filter=03.%20Pivot:%20Package/CVSS-Severity/CveID/Summary%20=%3E%20ServerName
localhost.json on 2020-02-04T01:25:11Z with 04. Pivot: Package/CveID => ScanTime filter
http://<server-address>:5111/?time=2020-02-04T01:25:11Z&server=localhost.json&filter=04.%20Pivot:%20Package/CveID%20=%3E%20ScanTime
localhost.json on 2020-02-04T01:25:11Z with 05. Pivot: CveID/PackageInfo => NotFixedYet filter
http://<server-address>:5111/?time=2020-02-04T01:25:11Z&server=localhost.json&filter=05.%20Pivot:%20CveID/PackageInfo%20=%3E%20NotFixedYet
FAQ
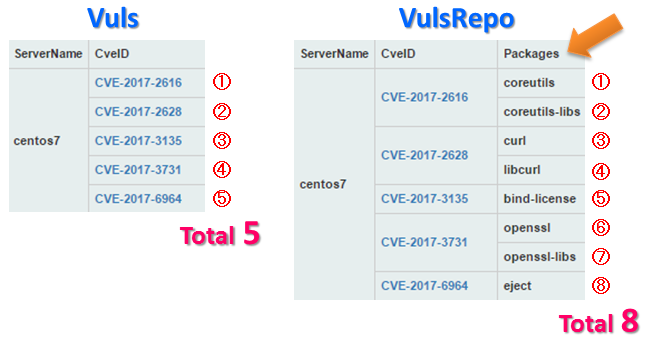
- Why does not Total of Vuls and VulsRepo result match ?
Vuls aggregates the number of CveIDs included in the host. However, VulsRepo counts Packages related to CveID as one case. If more than one package is associated with one CveID, Total will increase more than Vuls.
ギャラリー